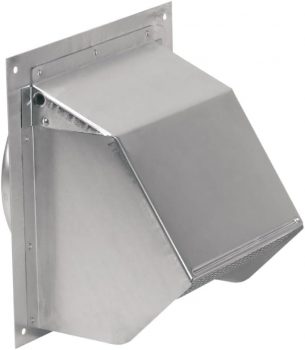

Welcome to our detailed exploration of the Broan 6″ 641 Wall Cap, a vital component for range hoods and bath ventilation fans. In this article, we’ll uncover the unique features, pros and cons, and overall value, ensuring you’re well-informed before making a purchase decision.
Product Features
| Feature | Description |
|---|---|
| Overall Size | 9″ square with a 5-1/2″ hood and 1-1/4″ long attachment collar for 6″ round ductwork |
| Backdraft Damper | Equipped with a spring-loaded backdraft damper and bird screen |
| Material | 22 gauge CRCQ steel construction with a .025 natural aluminum finish |
| Packaging | Sold as 1 to a carton |
Product Overview
| Pros |
|---|
| Durable 22 gauge steel construction |
| Efficient spring-loaded backdraft damper |
| Effective bird screen prevents critters from entering |
| Cons |
|---|
| Collar length may require additional ducting adjustments |
| Material could be lighter than some might expect |
Understanding the Broan 641 Wall Cap
When it comes to installing the Broan 641 Wall Cap, understanding the steps involved and preparing adequately is crucial. First off, you’ll need some essential tools: a power drill, a screwdriver, a measuring tape, and possibly a level to ensure everything fits perfectly. I’ve found that measuring the space where you plan to install the wall cap is important to avoid any last-minute surprises.
One common hurdle is dealing with existing ductwork. If you’re replacing an old wall cap, you may face challenges with aligning the new cap with existing duct openings. To troubleshoot this, make sure to carefully review the duct size before purchasing your Broan 641 Wall Cap; it is designed to fit 6-inch ducts, providing ample compatibility for most setups.
As for maintenance, keep in mind that routine inspections can prolong the life of your wall cap. I recommend cleaning the exterior periodically and checking for any blockages that may occur from debris or leaves. It’s also beneficial to inspect the flapper; a properly functioning flapper prevents outside air from entering your home and helps maintain energy efficiency.
By understanding these installation and maintenance tips, you will not only install your Broan 641 Wall Cap correctly but also ensure it works efficiently for years to come.
Installation and Maintenance Tips
Installing the Broan 641 Wall Cap can be a straightforward process if you’re equipped with the right tools and knowledge. Typically, you’ll need a screwdriver, a saw for cutting the ductwork, and a level to ensure everything aligns properly. First, determine the wall location for the cap, ideally ensuring it’s unobstructed and the venting duct doesn’t have too many bends. A common hurdle I’ve encountered, and one you should watch out for, is ensuring that the duct remains straight and free of kinks during installation, which can restrict airflow and jeopardize efficiency.
Once the box is secured to the wall, you’ll connect your ductwork, ensuring it fits snugly without gaps to prevent any air leaks. A good tip is to use foil tape for securing joints, as it holds up well under various temperatures and conditions.
For maintenance, I recommend checking the Broan 641 Wall Cap at least twice a year. Clear any debris or obstructions from the exterior and inspect for signs of damage or wear. A clean cap not only improves performance but also extends its lifespan. If pests are a concern, consider using a mesh screen to keep them out without blocking airflow. Taking these simple steps can help you enjoy the benefits of your investment for years to come, ensuring that your range hood and bath ventilation systems operate as effectively as possible.
Conclusions
In summary, the Broan 6″ 641 Wall Cap stands out with its solid construction and effective features. While it may require some adjustments for installation, its long-lasting durability and functionality make it a worthy investment for any ventilation project.